Tuesday, September 6, 2011

My Camera - Does it really matter what I use?


Camera. Does it really matter?

I have been told that "It isn't the Violin, it's the Violinist!"
I've also been told that "a camera is a box with a hole in it."

An Instant of Joy
And many other platitudes with some truth to them.

So it is with this question.

Composition is the first key to a great photograph. To identify what you want to photograph and capture the emotion and the beauty of a scene, it needs to be composed properly. Much of what I have written in these posts have had to do with the elements that make a great photograph. These elements are in the eye of the photographer and have nothing whatever to do with the camera.

The camera is a box with a hole in it. YOU decide what goes through that hole.

But no matter how well you compose an image, if the lens is dirty or cheap plastic like in the disposable cameras, don't expect to find competition winners among the prints. There are limits...

Most cameras have settings that you can adjust to get the best image, like ISO, flash on or off, or scene settings. Most name brand cameras also have very decent quality lenses and sensors. There are a few things to watch out for though.

Digital zoom. Turn it off. Now. I mean it. Stop reading, go get your camera and its manual, and turn Digital Zoom off.

Good. Optical zoom uses movement of the lens elements to adjust the zoom. That is great, and your image quality will not degrade as you zoom in, but digital zoom is another issue altogether. With digital zoom, the image you see is a progressively smaller portion of the image that falls on the sensor, until the image you see is only 100 K of the 10 megapixel sensor, or 1/100 of the resolution and clarity that the camera is capable of using only optical zoom.

The Power of a Kiss. This expression only lasted an instant...
The other fault inexpensive cameras have is the annoying delay between the time you release the shutter and when it finally takes the image. This makes it really difficult to catch the kiss, the puppy who was posed perfectly but has disappeared by the time the camera decided to take the photo, or the magnificent wave you saw crashing in on the beach.

It can be maddening. But it is the price you pay for using an inexpensive camera.

I use Canon products, currently the Canon EOS 5D Mk II. It is a 25 megapixel camera, and when I press the shutter release, it takes the photo instantly. As a pro, I have to have camera and lenses that can capture the instant, the emotion and the fun. It is what I am paid to do. 

Does the camera make me a better photographer?

No.

But it DOES make my images better, clearer, more instantaneous and reproducible to a larger size.

So you see, It isn't the Violin, it's the Violinist...... but a good violinist will sound better on a Stradivarius....

Until next time!

Thursday, June 23, 2011

What's in a background?


Amanda Ryen
All of the elements of a great photo need to come together to make it, well, great.

The subject, whether it a vista, flower, family or house, needs to be properly positioned in the frame, so you can show your viewer exactly what you want them to see.

The foreground needs to direct the viewer's eye where you want them to look.

The background, however, is the key. A lousy background makes a lousy photo, no matter what you do. A background has 2 purposes. First, it gives a sense of place, if that is what is intended. For those images where "place" is not necessary, the background should be either completely blurred out, or just not there.

Where place IS necessary, the background's second task is to NOT DISTRACT from the subject, or possibly even add to the subject's impact.

As you might imagine, I have difficulty coming up with examples of images where I messed up.

Oh, take notes here!

Sage thought for the day. If you screw up a photograph, delete it. It never, ever happened. Then, when people see your library of extraordinary photos, they get the idea that all you EVER take, are perfect photos. It's OK. Your secret will be safe with me.

So,  The little girl with antlers and flowers growing out of her head. This is a classic example of timing gone awry. I confess, this little beauty was showing off a flower girl dress, and was so awesome in her performance that I did not notice the background. Also, the child on the lap on the right hand side distracts from the image.

Kathy Nelson
Backgrounds can add so very much to an image. In this portrait of Kathy Nelson who owns a research data analysis firm, the background adds to the personality she has. She is shown (quite accurately) as someone who is friendly, approachable and comfortable to deal with; but also classy, learned and at the top of her field. Without the appropriate background, the image would have been not nearly as effective.

Sometimes, the moment is right, the expressions are perfect, the lighting is grand, and... the background is covered with trash and people. In this case, prepare yourself for a Photoshop session. David and Lauren here are on a beautiful path in a nature preserve in Harrisburg, PA. The problem was that the path had people and trash all over it.

After several hours of Photoshop work, cloning, adjusting levels, erasing and general enhancements, we got the results here.

Next week, your camera. Does it really matter? No...... and yes....

Oh! Homework! Go to a park, or the lake shore, or even your back yard or work... it doesn't matter. Have someone pose for you, and by YOU moving, not them, experiment with your background. Can they hide the garbage can? Can you bring out the personality of the background? Does it add to their composition?

Play! Have fun! You haven't been to a park in too long anyway.

Until next week!

Monday, June 13, 2011

Warning! Technical Term Ahead!


Depth of Field

Straight from Wikipedia: "In optics, particularly as it relates to film and photography, depth of field (DOF) is the distance between the nearest and farthest objects in a scene that appear acceptably sharp in an image."

When I was first learning photography, this was where my eyes glazed over and my brain shorted out.

Lets go back to last week and compare the little mountain and the little portrait on the wheel.

The mountain, or "Landscape" mode makes the aperture as small as possible, and adjusts the length of time that the lens is open so that the sensor or film receives the proper amount of light. The effect is to keep the foreground and background all in crisp focus.
Monroe Payne: "Cornell Rain"

In this case, you have a "Great" or "Large" or "Long" depth of field, or a large area that is acceptably in focus.

Now to the little portrait icon, or "Portrait" mode. In this case, the camera opens the lens as wide as possible to get the plane of the face in focus, but blurs out everything else, in front of and behind the face. Of course, this doesn't HAVE to be used on a face. It's just a good example.
Kim McAlear: "Dew"

This gives you a "Short" or "Small" depth of field.

So how can you use this?

It is our job as photographers to capture images that tell the story, but ONLY the story. A photo of a statue might be nice, but if the photo also captures, in sharp detail, the messy garbage can across the lawn, it takes away from the impact of your image.

We need to eliminate distractions, but I'll cover that in greater detail next week. Controlling your depth of field is one of many strategies we can use to eliminate those distractions.

Conversely, if we have a spectacular, sweeping landscape with some beautiful flowers in the foreground, the image really loses credibility if the flowers are blurry.

Chelsea Gordon: "Guitar Strings"
So where can we use depth of field as an end in itself, as an artistic tool?

Check out Chelsea Gordon's exquisite study of Guitar Strings, or Kim McAlear's Flower with Dew for examples of extremely short DOF. Large aperture, shorter exposure. f1.8

Jennifer Path: "Across the Fence"
Then look at these great depth of field images by myself and Jennifer Path. Small aperture, longer exposure. f22

Modern cameras have aperture priority settings. Lets go back to our little wheel. Aperture Priority means that the camera will accept your aperture setting manually, then magically adjust the shutter speed to compensate. The setting is usually identified as "A"-something. Canon cameras show "Av" on the wheel... The example last week just has "A".

Monroe Payne: "Theater Entrance"
Homework for this week - play with the aperture priority setting on your camera. Use the guitar strings and the barbed wire fence as templates. Then, intentionally set the aperture the other way. See which way is better. Have a little fun with it.

IthacaStock.com images by Kim McAlear, Chelsea Gordon, Monroe Payne and Jennifer Path. Please visit their galleries at IthacaStock.com.

IthacaStockTips is a free service from IthacaStock.com, and is intended to be used by individuals to increase their proficiency in photography. The information here may be copied and used, provided credit is given to Monroe Payne and IthacaStock.com LLC.

Friday, June 10, 2011

Settings


Booooooorrrring....... to quote Mindy when she was 14....

Owners manuals are a drag, but surprisingly useful from time to time. But they are not known for their riveting prose, or their story line. Remember the Manual in "Beetlejuice?" "This reads like stereo instructions..."

I'll try to make a little sense here of those little icons on the dial or screen of your camera.

Every camera is a little different, so I'll stick to the basics,

First, is automatic. This assumes you have no brain, and are only barely capable of pressing one button. The camera does everything for you except aim. It determines whether you need flash, how to focus, what your exposure should be, whether your hands shake, and if you've had too much coffee.

Ok, yours might look a little different...
Automatic has some uses, particularly in those spur of the moment instances, where if you have to think, you will lose the moment, and the shot. But in most cases, I avoid automatic. But not coffee.

Second, and more useful is "P" or Program Automatic. We are slowly taking control over from the little computer in the camera. We can determine whether to use flash or not, and we can compensate for the overall brightness of the images. The camera wants to see an "18% Gray" image. The palm of your hand is a good approximation of the brightness of 18% gray. But what if you are shooting on a sunny day in a snow covered field? The camera will try to average the scene at 18% gray, making it look muddy. In this case, you can tell the camera to overexpose the image. The reverse is true for dark scenes.

Now we get to the icons, or little pictures on the wheel. The little face is "Portrait Mode", which adjusts the camera to blur out the background while keeping your subject in focus. Yes, the camera is still thinking for you, but you are telling it to think in a very specific way.

The little icon of the mountain does exactly the opposite of the portrait mode. It tries to get everything in the viewfinder in focus from the extreme foreground to the distance. It does this by making the aperture smaller, and increasing the ISO (sensitivity of the sensor).

The flower icon means "Macro" mode, or extreme closeup. It allows you to take very crisp images very close to your subjects.

The Sports icon tries to get clear images of things that happen very fast, like hockey or lacrosse.

I have to admit, I don't use those settings, except "P", but it is good to know what they do.
My goal for you, is to have you thinking for yourself, rather than depending on a thumbnail sized electronic brain do it. But while you are learning, play with these settings, see what they do and how they affect the images you take.

Next week, we'll play with "Depth of Field". I promise it will be riveting!

Wednesday, May 25, 2011

Focus: The Sniper Method


Welcome to sniper school.

Do you ever wonder why snipers can hit their target from so many yards away? Why are they so accurate? What is it that they do that makes them so good?

It is the very breath that they take and their control of it that helps them hold the gun steady, and allows them to hit their target.

So how does that relate to cameras and focus?

Most of us shake a bit. Some of us shake a lot. I will try here to show you how to shake less, and follow through in your photo shooting.

Look at how sharp the focus is. This image
was hand held, using the techniques in this tip.
Here is part 1.

Hold your hand out in front of you.
Take a deep breath. Hold it for about 5 seconds.
Now  let it out slowly. It should take about 10 seconds.

If you are like most people, your hand will almost stop shaking completely between 6 and 10 seconds.

When you prepare to release the shutter (take the picture), breathe exactly the way we just did it. Pick the camera up to your eye, deep breath, then let it out. Squeeze the button between 6 and 8.

Here is the hard part. DO NOT take the camera down from your eye until you are done exhaling. It is called "follow-through" and is just as important for the photographer as it is for the baseball player. Or the sniper.
Homework for tonight is to breathe deeply, and get used to the idea of breath control. Go take some photos. Inhale, exhale slowly, THEN take the camera down. It will take a while to get used to it, but your crystal clear images will be well worth it!

Next week, what all of those settings mean - or at least some of them...

Monday, May 16, 2011

The Photographers' Perspective

To quote Charles Lewis, Successful photographers are those who do what the unsuccessful photographers are unwilling to do. He was talking about money, but it just as well applies to the artistic nature of your images, starting with where you take the photo from, or in other words, your perspective.


Photo by Monroe Payne
First, get over the idea of standing up while you take the photograph. Go ahead, get uncomfortable. Squat down or lie down to get the Chihuahua's eye view of the roses. Get on a ladder and photograph a train from the Engineer's altitude. Your images will be remarkable, at least in part, because you did what NOBODY ELSE was willing to do - or at least they didn't think of it first.

Anyone can pick up a camera, aim it and release the shutter. You, however, are better than that.

Photo by Mindy Porter
When you choose another perspective, you are treating your viewer to a different point of view of a "thing". Children, in particular, really look great - and very different - when you photograph them at THEIR eye level. Take it another level down to cat's eye level. Charming little kitty becomes a predator, or a tiny puppy looks truly lost in the grass.

Now try moving up! Use a ladder! Take your photos from an upstairs window to get, again, that point of view that nobody else is willing to get. You might even climb up a lighthouse's stairs. Or a fire tower. Me? I'm trying to find a good used cherry picker - you know, like the cable companies use... I don't climb trees any more...

Another, slightly more difficult (and uncomfortable) perspective is "from the inside out".
Get inside a shrub, or closet, or for that matter, under a bed, and photograph "from the inside out". This is an exercise, folks. Play with it. Try all sorts of things, that involve a camera and discomfort, and you will be amazed.
Photo by Miles Lumbard
Photo by Richard Nagle

The next, and perhaps most uncomfortable thing to do is be patient. Eagles and Hummingbirds do NOT appear on request. Wait. Be patient. Be quiet. Your patience will be rewarded. Usually about 20 minutes AFTER you have decided that this is a stupid thing to do - but you decided to hang around for "just a couple minutes more..."

This June, I plan on being on the lake at 3AM to get a particular building illuminated by a bright full moon. Why? Because I have seen the image in my mind, and want to capture it. I will not be denied.

I promise, I will share the image as soon as I have it. You will be amazed.

Homework? Create an image from a unique perspective in your mind. Do whatever is necessary to make it real, and to capture it in your camera. Just remember, you MUST be uncomfortable when you take it. No pain, no art!

Next week, the secret of perfect focus.

All of the photos used are from IthacaStock.com contributors. Please visit their galleries on IthacaStock.com, Richard Nagle, Miles Lumbard, Mindy Porter and Monroe Payne

Also, please follow this blog for weekly tips, and by all means, visit our Facebook page, ithacastock.com.

Wednesday, May 4, 2011

Curves


Curves. I love curves. Roundnesses. Softnesses.

Curves are the most pleasing thing that they eye can see.
 
They lead, they entice, they draw you in and let you wonder what is around the next curve. We are trained to see straight lines, whether it be the shortest point from here to there, like an Interstate Highway out west, or the roof line of your house, or the lines in the sidewalk. The lines are there, but for the most part, are fairly uninteresting.

Curves, on the other hand, are like the back road through the trees, a garden path, the Blue Ridge Parkway, the softness of the female form, or even the rippling biceps of the muscle man. Curves are organic, which is why, I think, that we are so drawn to them as an element of art.

Straight lines have their place, but are very mechanical and organized.

Curves remind us of our humanity, and our natural being. So let's incorporate them into our images!

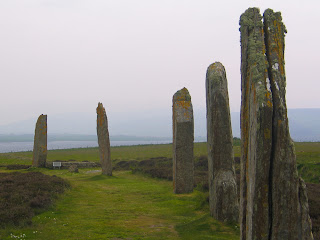
So where do we find curves? Just about everywhere that nature is involved. The sun, the moon, the shoreline of the lake, the road through the snow covered woods - but curves can be there without the "line" of the curve. This photo of the Ring of Brodgar is a case in point. The tops of the standing stones make a curve, drawing you into the image.

If you don't know, the Ring of Brodgar is Stonehenge's  biggest brother, measuring 138 meters across. You can find this, the largest Henge in the world on the mainland of the Orkney Islands, north of Scotland.

Curves are not only in nature and can be manufactured as well - and that is why the Opera House in Sydney, Australia is so celebrated. Manufactured curves on that scale are not so commonly found in architecture. Again, they lend an organic flavor to the building that is missing in most construction.

And here is the biggest curve I have photographed, leading your eye to the Space Shuttle on the launch pad.

So your homework, should you choose to accept it. is to find and photograph some curves. Don't limit yourself to curvy lines drawn in the sand. See the curves in everything, like these roses...

Friday, April 22, 2011

Life on the Diagonal

A photo is a two dimensional thing. It has height and it has width, but alas, no depth.

So how can you add a third dimension to the lowly photograph?

Ok, you can’t. But you can create the illusion of depth in your images with the use of diagonal lines. The most basic way to do this, by example, is by taking a photo of a house from the corner instead of straight on. Look at how you can tell that your subject, the house, has a real sense of depth.

But that is just a starting place.

Diagonals are everywhere - but sometimes they are so obvious that you have to look for them.  Consider the street you live on. Where are the diagonals? Look at the curbs and how the trail off into the distance? Diagonals!

The hallway at school. Photogenic? You may not think so - but look! Step to the side and you have created diagonals and perspective, and DEPTH. That's what we are looking for, that third dimension.

Diagonals don't stop there. Look at a line of trees, and how their trunks make a line. Look at any thing or scene that interests you. Move yourself until you find an angle that generates a diagonal leading you in to the photos!

Homework? Use the "Boom!" method from March 30, or use your camera and take photos of your own house or building, emphasizing the diagonal lines formed by the roof and the walls,  and notice how your position changes everything!

Next week, curves!

Wednesday, April 13, 2011

The Rule of Thirds


Art has rules, or at least guidelines….

Here is the “Rule of Thirds”, paraphrased. “Imagine a tic-tac-toe board, with your two horizontal and two vertical lines drawn on your image. The center of interest of an image should be at one of the four intersections of those tic-tac-toe lines.”

These rules aren’t spoken by some “sage of artiness” with no context. These rules work. What most people do NOT know, is WHY the rules work, and exactly what the intent of the rules is.

Take a look at any "snapshot". The subject is in the exact center, you see what it is, then go to the next picture. How fulfilling. (not…)

Compare that with the well composed image, with the center of interest being at one of the “third” intersections. Pay attention to where your eyes go. Do they explore the image? Do they look around to see what else they can find? Are your eyes and your interest drawn in to the image?

You see, THAT is the intent of the “Rule of Thirds”, to make your eyes explore, and your mind be interested.

You may have noticed, I don’t talk about “pictures”, rather “images”. You “take” pictures, you “create” images. A snapshot is a picture, Images are created, designed and planned. My goal for you, dear reader, is for you to begin to create beautiful, exciting, provoking images that your friends and colleagues will be very, very impressed with.

Homework? Find a photo you have taken that you feel is really good, and compare it to one where the subject is planted smack in the middle. Compare your photos paying attention to which image is more interesting. See?


Wednesday, April 6, 2011

Your Subject

A photo needs a subject, and people who look at the photo really ought to be able to tell what it is... No, I'm not trying to be insulting, but it's amazing how many images I see that have no identifiable subject.

When I was 12 (back in the dark ages) my family traveled around the country. It seemed that every rise we went over, every corner we went around and every change of weather, we had to stop, get out of the car, and take a photo.

When all of the slides finally got processed and we watched them, we were impressed by how many "photos of nothing" we had. Ok, so each "nothing" was a little different, but they were still "nothing", and definitely nothing we wanted to show to friends, because they were, after all, "nothing". See? This is a photo of "Nothing". Pretty nothing, but still, nothing.

Another issue with most of them was that the horizon or coast line was dead center in the image. So there was the additional question, is the subject supposed to be the land, or is it the sky? Or is it still, just "nothing"?

So this is step one. Identify your subject. Look through the viewfinder, and ask yourself, "What IS the subject?". If you can't INSTANTLY answer, recompose your image.

And don't be afraid of filling your frame with the subject. We photographers, until we realize that our clients expect it, try to hold back and not "get in their faces". Of course, this doesn't mean that you should be pushy or obnoxious, but it DOES mean that if you are being paid to do a job, you shouldn't be relegated to the background.

Later on in this series, we will cover ways to separate your subject from the background, and ways to clean up your background - but right now, you need to IDENTIFY exactly what your subject is.
 
It may be the children at play, the expression when the 2 year old gets their first dill pickle, the awesome sunset through the trees, the statue in the park with the birds ….doing what birds do. Or even Stonehenge's big BIG brother, The Ring of Brodgar on the Orkney Islands...

It doesn’t matter what you choose for the subject – but it DOES matter that your viewer can identify your subject. Next time, where should you put your new found subject?

Homework? Take photos in or around your home, and fill the frame with your subject. Be a little nuts about it. Make it IMPOSSIBLE to NOT know what your subject is.

Wednesday, March 30, 2011

Boom!

You don't need a camera for this exercise.

Hold your hands up like you're holding a phantom, imaginary camera, and move your shutter finger, and at the same time, say "Boom". Don't SHOUT it, c'mon, that's just weird.

Do you feel silly? Don't. I got this from Kevin Kubota, one of the best known photographers in the world. (and a really cool guy as well...)

Have you ever wondered how those supremely talented photographers can find the instant of maximum emotion or action? It's not chance. It is practice, and practice, and practice. The cool thing is, you don't have to have a camera in your hands in order to practice.
Little Angel

Walk downtown in whatever place you find yourselves. When you pass a little cafe with people talking outside, couples seated deeply in conversation, hold up your imaginary camera and go "boom". Try to catch the moment, the proper look, the downcast eyes or the eyes searching deeply into the eyes of the other. Find the moment, the smile, the earnest look of the salesman, the laugh of the children..... "Boom".

It's ok, you can whisper "boom". It works no matter what volume you boom at, although if you do it loud, you might break the mood you are observing...

And if your subjects see you "booming", you will probably get a smile. And if you tell them that you are a photographer and impressed with their expressions, you might end up with a friend or even a client. You never know!

Boom!

Homework? Be aware of where you are, and all of the images and expressions you are surrounded by, all day, every day. Then, of course, “Boom” them!

Coming next week.... It's all about the subject...

Thursday, March 24, 2011

March 23, 2011: Develop your "Swipe" File

I have a massive number of other people's photos. I have images that I cut out of magazines, photographed from billboards and displays, and yes, swiped from the web.

Nobody but me actually SEES these images, but they are my life blood.


You see, being a "professional" photographer, it is assumed that I am this classy, artsy kind of person who is being creative and has every little nuance of every image firmly created in my artsy little brain before I ever touch the camera.

It's a nice thought, but it ain't so. Here is your epiphany of the day.

There is nothing you, as a photographer can do, that hasn't been done before. What makes your (and my) work unique, is the way you take things that have been done before and assemble them in your own way.

So learn, "swipe", clip and review those images that really appeal to you.

What I do, is take all of those digital files and make them into a screensaver for the computer. Those images, created by the best photographers in the world, are always in front of me, inspiring me, giving me ideas, causing me to experiment to try to recreate those effects, and helping me plan on how I can USE those ideas for the benefit of my clients.

USING, playing, creating and improvising based on those magnificent images is one step that will help you become an extraordinary photographer.

Homework? Go visit some incredible photographer’s web sites. Photographers who do remarkable landscapes like Joe Brady at http://www.joebradyphotography.com/, or Peter Lik at www.peterlik.com. Another favorite of mine is www.indigophotographic.com, Michael Barton's web site. He centers on people with a delightfully unique perspective. 

The image displayed here, titled "I See your Soul", is inspired by the work of Michael Barton of www.indigophotographic.com.

Immerse yourself in the beauty of their work.